
Landscape Supplies
In No Mess Bulk Bags
Soil, Stones, Pavers & More

When done correctly, a professional garden can be stunning, and lift the quality of any house. Yet professional yard maintenance can also be highly expensive! With a bit of elbow grease, inexpensive and quality landscaping supplies and the right choice of plants, you can turn any yard into a veritable paradise.
The greatest problem today with developing a garden in the modern society is the cost that is involved with it. If it’s not the purchasing of the seedlings then it is the sourcing of the product, not to mention the cost of hiring a landscaper to do the work for you. Fortunately, there is a way around this and by sourcing your landscape supplies online you can makeover your house in the space of a weekend!
Before you can choose the products and quantities you need, you must consider how your future garden is going to look. Do you want to establish a vegetable garden in one corner, or do you want to create a tiled pathway out to the patio? There are a plethora of ways you can do it, and tips and tricks to help your garden look beautiful.

Some things to consider before you do this however is whether or not have a professional design created for your yard. Professional landscapers can be found all over Auckland and can help you evaluate your yard and work out what will (and won't) work in the garden!
Or, if you prefer the DIY route, then you could consider looking at pinterest or Houzz, for some unique ideas and opportunities to improve your garden. Both sites feature stunning examples of gardens and niche concepts that will help you get the garden you desire, at half the price of hiring a landscaper (plus its a great excuse to get yourself, or the kids outdoors!)
Before you begin any work in the yard at all, make sure to clear out the excess of garden matter and dispose of it. The easiest way to do this, is to hire a skip for a weekend and load it full of product; a great excuse for a family working bee!
Once the yard is cleared out, you can take the measurements of product that you need. To calculate the cubic amount that you’ll need you simply need the following dimensions:
You’ll need to calculate the width and the height and the length of the area you are wanting to work with.
EXAMPLE ONE
If your area of garden was 5 metres long, and 3 metres wide, and you wanted to lay the garden mix at a depth of 100mm, you would calculate it as follows:
3x5x0.1 = 1.5m3
It is important to have all the digits as metre lengths, rather than different variants as this throws it off. Therefore 100m = 10cm = 0.1 metres
You would then know from the above calculation, that you have the option of either a 1m3 bag of Booster Garden Mix and a 0.5m3 Bulk Bag of Booster Garden Mix, or optionally, you could also calculate the literage needed and instead opt for carryable 40L bags of Booster Garden Mix.
To calculate literage needed, you take the final result of the above calculation (1.5) and multiply it by 1,000.
Therefore, 1.5 x 1000 = 1,500L
EXAMPLE TWO
If you have a garden in need of some sand, that was 1 metre wide, by 9 metres long, and you needed to lay it at 200mm depth, you would calculate as follows:
1x9x0.2 = 1.8m3
1.8x1000 = 1,800L
In this instance, you would need to contact us to arrange delivery of 1.75m3 of product, as well as a few carryable bags to deliver the balance of that product.
Keep in mind that in order for a successful delivery of the bulk bags to take place, you’ll need to have acceptable clearance for our forklift and trucks. For more information on this, please refer to our truck mounted forklift blog, which covers all of the basics of delivery, or if you’re still unsure then click here to contact our customer services team.
There are many different ways to lay different products, and fortunately for you we have many different blogs covering this. But always remember that if you require weedmat, you will want to lay it down before you follow any of the beneath blogs. Please choose from the following list to read up on how best to lay your product of choice:
If you are in need of any heavy machinery or industrial tools to get the job done and are landscaping within Auckland, then it pays to ensure that these will be available after your product will be onsite. Hirepool or Kennard's Hire can provide you with all the tools you might need, to whip your garden into shape!
We aspire to develop this weekly, so refer to our Facebook page, subscribe to our mailing list or add our blog page to your favourites to keep up to date!
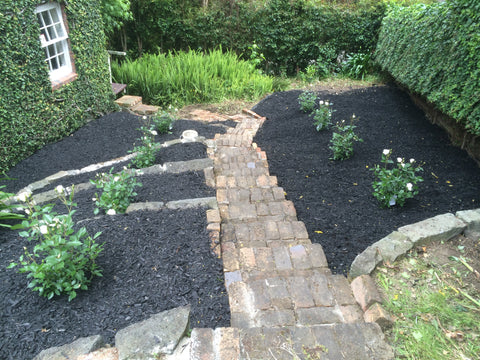
Each of our product pages features a guide to laying product, but just as an example, we will look at Black Mulch.
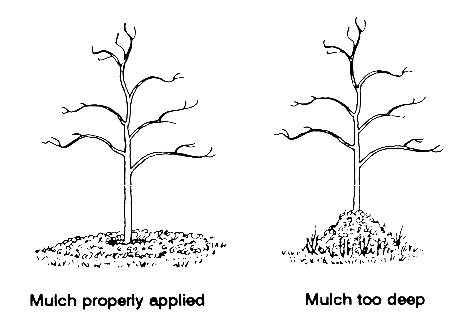
Black Mulch is dyed with an organic, black vegetable dye and as a result has a beautiful aesthetic that can boost any garden. Additionally however, it also provides magnificent benefits to garden development as it operates as a natural weed suppressant and a kind of insulation for your plants. If laid at a minimum of 100mm (10cm or 0.1m), it prevents weeds from being able to push up to the surface and grow. Whilst during the winter and the summer, it keeps the plants warm and cool respectively. When laying it against existing plants and trees, be careful to not stack it up around the trunk. Often, new landscapers or DIY gardeners will layer the mulch around the truck however owing to the natural decomposing feature of mulch, the resulting acids and scents can strip away bark from the tree and damage it quite profusely. Mulch can also attract insects which are prone to damaging trees and therefore it is best if they are not too close to it. 3-4mm around the base is perfect, but stacked up against the trunk is not. Refer to the image beneath as an example of how to lay your mulch. Keep in mind that whilst the black dye is not dangerous, if used on a vegetable garden it can rub off on growing plants and cats love to run around in it before walking through your freshly cleaned house.
Don't just take our word for how much a Cubag can improve your garden! One of our loyal customers recently recorded a video for us, and had the following to say!
Leave a comment